Table des matières
Esia Upgrade - Debian 10 to Debian 11
Introduction
The upgrade process depends very much on the customisation that has been done on your Esia in terms of plugins.
The more plugins you have added, the more likely these plugins are to fail after the update. It is therefore all the more important to respect the backup process in addition to the snapshot in order to avoid having to perform a rollback.
The rest of the tutorial covers :
- 2. Prerequisites Necessary to start the update.
- 3. Updating process Steps required to complete the update.
- 4. Troubleshooting Troubleshooting: Refer to this chapter only if you encounter a problem in point 3.
- 5. Cleaning To recover disk space after the update.
It is highly recommended, if not necessary, to have read this tutorial at least 1 time in its entirety before starting the production update.
Prerequisites
Before starting the update, all of the following points must be met:
- Have an internet connection to download the update packages.
- Make a snapshot of the VM beforehand in order to quickly return to the previous state in the event of MAJOR problems.
- Make a backup of certain Esia files. To avoid having to rollback the snapshot in the event of a SMALL problem. This step is NECESSARY in the event of a support call. See point 3.1.1 « Make a backup of your Esia »
Update steps
Pre-update preparation
The following 3 steps should be carried out in the desired order.
Make a backup of your Esia
This will avoid having to return to the snapshot in the event of a simple plugin error or similar. Plugin errors are sometimes unavoidable and make this task necessary.
The steps are :
Check that you have enough disk space for the backup using the command :
- copy
df -h /root
The disk space required for the backup depends on your Esia. But if you use less than 50% of your disk space. You are sure to have enough.
- backup.sh
#!/bin/bash
cd /
mkdir -p /root/BACKUP_ESIA
su postgres -c pg_dumpall > /root/BACKUP_ESIA/pg_database.sql
cp -r /usr/local/esia/plugins /root/BACKUP_ESIA/plugins
cp -r /usr/local/esia/public_html /root/BACKUP_ESIA/public_html
cp -r /etc/apache2 /root/BACKUP_ESIA/apache2
cp -r /etc/esia /root/BACKUP_ESIA/esia_conf
iptables-save > /root/BACKUP_ESIA/iptables.txt
dpkg -l > /root/BACKUP_ESIA/version.txt
You can check whether the backup was successful by entering the following command:
- copy
du -sh /root/BACKUP_ESIA/*
Examples:
On a small esia
root@debian-buster:~# cd /
root@debian-buster:/# mkdir -p /root/BACKUP_ESIA
root@debian-buster:/# su postgres -c pg_dumpall > /root/BACKUP_ESIA/pg_database.sql
root@debian-buster:/# cp -r /usr/local/esia/plugins /root/BACKUP_ESIA/plugins
root@debian-buster:/# cp -r /usr/local/esia/public_html /root/BACKUP_ESIA/public_html
root@debian-buster:/# cp -r /etc/apache2 /root/BACKUP_ESIA/apache2
root@debian-buster:/# cp -r /etc/esia /root/BACKUP_ESIA/esia_conf
root@debian-buster:/# iptables-save > /root/BACKUP_ESIA/iptables.txt
root@debian-buster:/# dpkg -l > /root/BACKUP_ESIA/version.txt
root@debian-buster:/# du -sh /root/BACKUP_ESIA/*
652K /root/BACKUP_ESIA/apache2
32K /root/BACKUP_ESIA/esia_conf
4,0K /root/BACKUP_ESIA/iptables.txt
660K /root/BACKUP_ESIA/pg_database.sql
7.9M /root/BACKUP_ESIA/plugins
23M /root/BACKUP_ESIA/public_html
96K /root/BACKUP_ESIA/version.txt
root@debian-buster:/#
On an Esia with 150 nodes/1800 services
root@enterprise-v3:~# cd /
root@enterprise-v3:/# mkdir -p /root/BACKUP_ESIA
root@enterprise-v3:/# su postgres -c pg_dumpall > /root/BACKUP_ESIA/pg_database.sql
root@enterprise-v3:/# cp -r /usr/local/esia/plugins /root/BACKUP_ESIA/plugins
root@enterprise-v3:/# cp -r /usr/local/esia/public_html /root/BACKUP_ESIA/public_html
root@enterprise-v3:/# cp -r /etc/apache2 /root/BACKUP_ESIA/apache2
root@enterprise-v3:/# cp -r /etc/esia /root/BACKUP_ESIA/esia_conf
root@enterprise-v3:/# iptables-save > /root/BACKUP_ESIA/iptables.txt
root@enterprise-v3:/# dpkg -l > /root/BACKUP_ESIA/version.txt
root@enterprise-v3:/# du -sh /root/BACKUP_ESIA/*
692K /root/BACKUP_ESIA/apache2
32K /root/BACKUP_ESIA/esia_conf
4,0K /root/BACKUP_ESIA/iptables.txt
22M /root/BACKUP_ESIA/pg_database.sql
9,1M /root/BACKUP_ESIA/plugins
604M /root/BACKUP_ESIA/public_html
116K /root/BACKUP_ESIA/version.txt
root@enterprise-v3:/#
In the event of an error, files/directories are missing or empty
root@debian-buster:/# cd /
root@debian-buster:/# mkdir -p /root/BACKUP_ESIA
root@debian-buster:/# su postgres -c pg_dumpall > /root/BACKUP_ESIA/pg_database.sql
pg_dumpall: could not connect to database "template1": could not connect to server: No such file or directory
	Is the server running locally and accepting
	connections on Unix domain socket "/var/run/postgresql/.s.PGSQL.5432"?
root@debian-buster:/# cp -r /usr/local/esia/plugins /root/BACKUP_ESIA/plugins
root@debian-buster:/# cp -r /usr/local/esia/public_html /root/BACKUP_ESIA/public_html
root@debian-buster:/# cp -r /etc/apache2 /root/BACKUP_ESIA/apache2
root@debian-buster:/# cp -r /etc/esia /root/BACKUP_ESIA/esia_conf
root@debian-buster:/# iptables-save > /root/BACKUP_ESIA/iptables.txt
root@debian-buster:/# dpkg -l > /root/BACKUP_ESIA/version.txt
root@debian-buster:/# du -sh /root/BACKUP_ESIA/*
652K /root/BACKUP_ESIA/apache2
32K /root/BACKUP_ESIA/esia_conf
4,0K /root/BACKUP_ESIA/iptables.txt
0 /root/BACKUP_ESIA/pg_database.sql
7.9M /root/BACKUP_ESIA/plugins
23M /root/BACKUP_ESIA/public_html
96K /root/BACKUP_ESIA/version.txt
root@debian-buster:/#
Make a snapshot of the VM
In order to come back quickly in case of a complete crash.
Disable the alerting system
To avoid receiving false positives during the update.
- copy
chmod -x /usr/local/esia/plugins/alerting/*
Updating
Updating works like this:
- Modify the package source file to indicate that you are switching to bullseye (command sed)
- Update the system database containing the list of packages (command apt update)
- Update the system ( apt dist-upgrade). Before executing this command, we strongly recommend that you note the time and check the current status of your alerts. This will help you later to check whether the Esia plugins are working correctly after the update.
Prepare the update :
Check the source apt file, using the following command:
- copy
cat /etc/apt/sources.list
You should get the following lines:
deb http://deb.debian.org/debian buster main contrib non-free
deb-src http://deb.debian.org/debian buster main contrib non-free
deb http://stable.repository.esia-sa.com/esia buster contrib non-free
If necessary, edit the file with the nano command (ctrl + o to save and ctrl +x to exit).
- copy
nano /etc/apt/sources.list
We are now going to replace all the busters with bullseye and update the list of packages.
- copy
sed -i s/buster/bullseye/g /etc/apt/sources.list
sed -i s#bullseye\/updates#bullseye-security#g /etc/apt/sources.list
apt update
Example
root@debian-buster:/# sed -i s/buster/bullseye/g /etc/apt/sources.list
root@debian-buster:/# sed -i s#bullseye\/updates#bullseye-security#g /etc/apt/sources.list
root@debian-buster:/# apt update
Get:1 http://10.8.0.9 bullseye InRelease [2,271 B]
Get:2 http://10.8.0.9 bullseye/contrib amd64 Packages [7,200 B]
Get:3 http://10.8.0.9 bullseye/non-free amd64 Packages [1,963 B]
Ign http://10.8.0.9 bullseye/contrib Translation-en_US
Ign http://10.8.0.9 bullseye/contrib Translation-en
Ign http://10.8.0.9 bullseye/non-free Translation-en_US
Ign http://10.8.0.9 bullseye/non-free Translation-en
Ign http://ftp.be.debian.org bullseye InRelease
Get:4 http://ftp.be.debian.org bullseye Release.gpg [2,410 B]
Get:5 http://ftp.be.debian.org bullseye Release [118 kB]
Get:6 http://ftp.be.debian.org bullseye/main amd64 Packages [7,080 kB]
Get:7 http://ftp.be.debian.org bullseye/main Translation-en [5,377 kB]
Fetched 12.6 MB in 2s (4,354 kB/s)
Reading package lists... Done
root@debian-buster:/#
Check the current state of your system:
Note what time it is.
Check system disk space using the command below:
- copy
df -h |grep -v tmpfs|grep -v udev|grep -v /boot
Example:
root@enterprise-v3:/# df -h |grep -v tmpfs|grep -v udev|grep -v /boot
File system Size Used Available Uti% Mounted on
/dev/mapper/buster--students--vg-root 19G 7,7G 9,9G 44% /
root@enterprise-v3:/#
Running the update :
To download the ESIA + OS update
- copy
apt -d dist-upgrade
Before confirming, check that you have enough disk space:
Then run the following command to apply and configure the packages:
- copy
apt dist-upgrade
In the example below, 392 MB + 935 MB will be required during installation.
498 upgraded, 148 newly installed, 5 to remove and 0 not upgraded.
Need to get 0 B/323 MB of archives.
After this operation, 652 MB of additional disk space will be used.
Do you want to continue? [Y/n]
- For all questions, leave the default answer.
- For the question about GRUB it is important not to make a mistake and to tick the correct the correct VM boot disk. Otherwise the VM may stop booting.
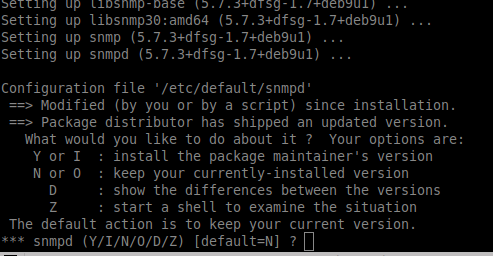
Examples of questions asked
Answer with “Yes” then ENTER
The default answer is always 'N', so all you have to do is press ENTER.
The update is complete
If there are any errors on esia-rcmwait for the update to finish and then go to the troubleshooting section ⇒ Python libraries repository inaccessible
Post-update restart of important modules
Disable the alerting system again
Updating Esia automatically reactivates the alerting system. As long as you do not activate the Esia licence, you will not receive any alerts. However, once the licence has been activated, you may receive false positives.
It is therefore advisable to re-execute the following command before activating the licence.
- copy
chmod -x /usr/local/esia/plugins/alerting/*
Remove the old Debian buster packages
This step is necessary, in addition to saving disk space, keeping old versions of packages could :
- Cause bugs in Esia
- Cause problems in future updates.
It is therefore strongly recommended that you carry out this step even if your Esia is now working correctly. In addition, it also helps to highlight problems/bugs that could occur later at random.
- copy
apt autoremove
Then confirm the deletion.
Updating your Esia database
Use the following commands to update your database. Your Esia is currently running without this step. But if you ignore it, problems will occur in future updates.
Check the presence of the databases :
- copy
pg_lsclusters
Example
root@debian-buster:/# pg_lsclusters
Ver Cluster Port Status Owner Data directory Log file
11 main 5432 online postgres /var/lib/postgresql/11/main /var/log/postgresql/postgresql-11-main.log
13 main 5433 online postgres /var/lib/postgresql/13/main /var/log/postgresql/postgresql-13-main.log
root@debian-buster:/# Delete the new database
- copy
pg_dropcluster 13 main --stop
pg_lsclusters
![]() For the pg_dropcluster be sure to set 13 and not 11! It's vicious!
For the pg_dropcluster be sure to set 13 and not 11! It's vicious!
Example
root@debian-buster:/# pg_dropcluster 13 main --stop
Redirecting stop request to systemctl
root@debian-buster:/# pg_lsclusters
Ver Cluster Port Status Owner Data directory Log file
11 main 5432 online postgres /var/lib/postgresql/11/main /var/log/postgresql/postgresql-11-main.log
root@debian-buster:/#
Copy the old database (from your Esia) to the new version
- copy
pg_upgradecluster 11 main
pg_lsclusters
The first command takes some time to run. Once completed, the pg_lscluster shows this:
Example
root@debian-buster:/# pg_lsclusters
Ver Cluster Port Status Owner Data directory Log file
11 main 5433 down postgres /var/lib/postgresql/11/main /var/log/postgresql/postgresql-11-main.log
13 main 5432 online postgres /var/lib/postgresql/13/main /var/log/postgresql/postgresql-13-main.log
root@debian-buster:/#
Then check that your web interface is working correctly.
Getting the Esia web interface to work
After installation, you need to run the following commands to get the web interface working again.
- copy
a2dismod php7.3
a2enmod php7.4
service apache2 restart
apt remove php7.3
apt autoremove
Go to your Esia main web page
After the update, connect to your Esia server and refresh your browser cache (ctrl +F5 in Firefox). The menu button bugs will be corrected.
Essential tasks at the end of the update
Check if your VM restarts
Restart your VM and check that the restart works. A configuration error in GRUB or in the system update could mean that the VM no longer starts. Or that certain Esia services do not restart automatically.
It is necessary to perform this operation as long as the snapshot is sufficient to avoid losing too much data.
To reboot cleanly, enter the following command:
- copy
shutdown -r now
Check the status of your services
Some monitoring plugins may no longer work after the update. This is often the case when additional plugins have been manually installed. It is therefore advisable to check that these plugins are working in 2 ways:
Method 1: Check the status of nodes and services
Compare the current status of your nodes and services with the screenshot taken earlier. If there is a small or minimal difference, then the update has probably gone well.
If there is a large difference, either :
- There have been breakdowns in your infrastructure.
- Some of your plugins are no longer working after the update. (If this is the case, please contact our support team)
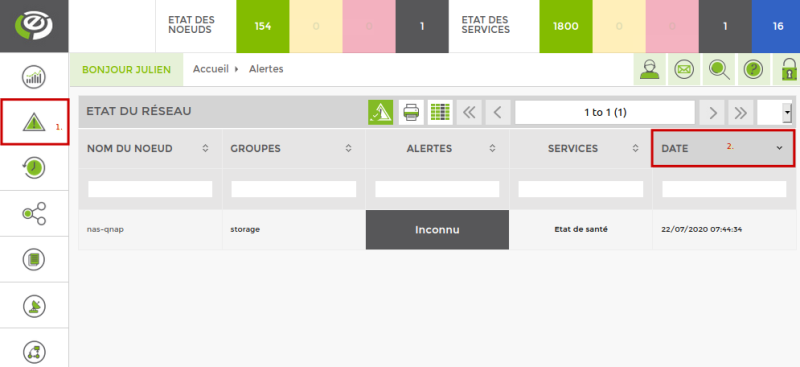
Method 2: Check for new alerts
Go to the current alerts page. If you have a lot of alerts, sort them by date.
You should have noted the start time of the update. Use this information to check the alerts that took place afterwards. For the most part, within 10 minutes of :
- licence activation.
- reboot of the machine.
These alerts can be caused by :
- A problem in your infrastructure.
- A malfunction of the plugin after the update.
Example:
Reactivate the alerting system
Once your Esia is working properly, don't forget to reactivate alerting:
Activation :
- copy
chmod +x /usr/local/esia/plugins/alerting/*
Check if it is activated :
- copy
ls --color -l /usr/local/esia/plugins/alerting/*
In the examples below, the green colour indicates that the scripts are executable. They are therefore activated.
Examples :
Alerting disabled
Alerting on
Now you need to check that you are receiving the alert emails.
- copy
/usr/local/esia/plugins/alerting/send_mail_html.pl -e min -t <votre adresse mail> -D
Check whether an email has arrived in your inbox.
Troubleshooting
All units are disconnected
The configuration of Esia's internal firewall may have removed the connection authorisation for the unitys. Type the following command line
- copy
iptables -L
If you don't find a line like:
ACCEPT tcp -- anywhere anywhere tcp dpt:2080Type the following commands to open the port and save the configuration:
- copy
iptables -A INPUT -p tcp -m tcp --dport 2080 -j ACCEPT
iptables-save > /etc/iptables.rules
The web page is inaccessible
Configuring php7 in Apache
Have you run the following command?
- copy
a2dismod php7.3
a2enmod php7.4
service apache2 restart
Check the status of the Apache2 service
- copy
service apache2 status
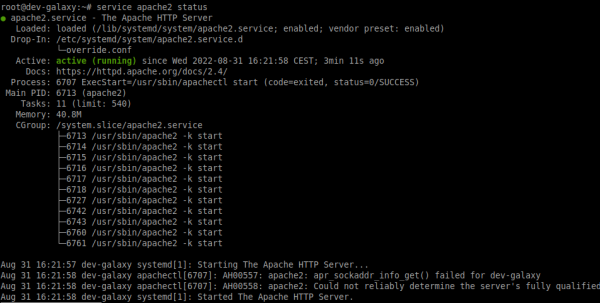
Example of a stopped Apache2 service :
Example of a started Apache2 service :
Try to restart the Apache2 service
- copy
service apache2 start
service apache2 status
Python libraries repository inaccessible
If the esia-rcm package does not install correctly, it is probably because it does not know how to install its Python dependencies. Check that the server can reach pypi.org in http. If you can give it this access, skip the next step.
Install python dependencies manually
If you can't give access to pypi.orgyou can install the missing libraries manually. From a PC with Internet access, download the following files:
Then transfer them to the Esia server and type the following commands:
![]() For apt commands, be sure to read what it is going to do before validating and check that it is not going to delete any esia packages!
For apt commands, be sure to read what it is going to do before validating and check that it is not going to delete any esia packages!
- copy
apt install python3-cryptography
- copy
pip install pyspnego-0.10.2-py3-none-any.whl
pip install pypsrp-0.8.1-py3-none-any.whl
Finalising the installation of esia-rcm
Relaunch apt dist-upgrade to finish configuring the esia-rcm package.
![]() For apt commands, be sure to read what it is going to do before validating and check that it is not going to delete any esia packages!
For apt commands, be sure to read what it is going to do before validating and check that it is not going to delete any esia packages!
- copy
apt dist-upgrade
Check that the package is installed and configured correctly:
- copy
dpkg -l | grep esia-rcm
This should be displayed (the package name must be preceded by the tag ii) :
root@debian-bullseye:~# dpkg -l | grep esia-rcm
ii esia-rcm 0.0.3+1r0 all Remote Control Manager
Cleaning
This little clean-up is not compulsory. It saves a lot of disk space. It is advisable to carry out the following steps once you are sure that everything has gone smoothly. You may even want towait several days after the update.


