Table of Contents
Enable SNMP on HP Switches
Enable SNMP on HP-2500+ Switches
This tutorial also works on switches 3500,3800 Connect to the console or ssh with administrative rights and go to configuration with the following command:
- copy
configure terminal
To configure your SNMP community, use this command (replace “<votre communauté>“with the command of your choice).
- copy
snmp-server community "<votre communauté>" Operator
You can then specify location and contact information using these commands:
- copy
snmp-server contact "support"
snmp-server location "rack de devellopement"
And that's it, SNMP maintenance is enabled. You can apply the pattern “default_snmp_hp_switch” or default_gesa_snmp_hp_switch”.
Enabling SNMP on HP-1910 switches
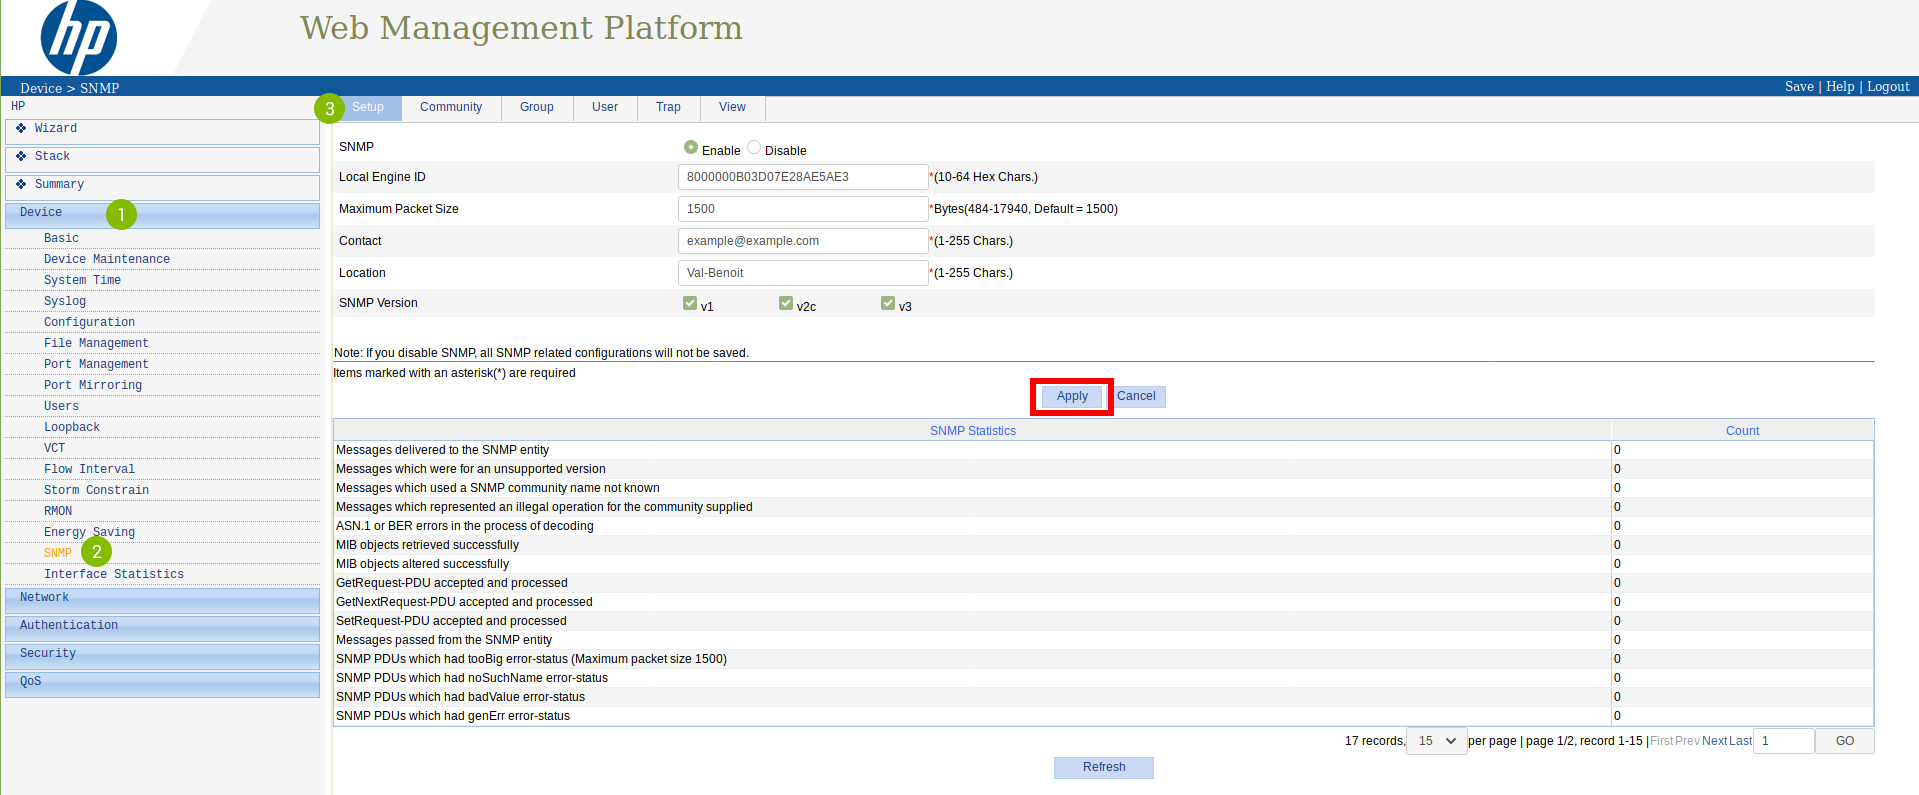
Go to the switch's web interface by typing its IP in the URL. Go to the menu « (1)Device ⇒ (2)SNMP ».
You will arrive on the tab « (3)Setup » :
Check the box « Enable »box, fill in the « Contact » and « Location ». Tick the SNMP versions you wish to activate.
Then click on « Apply ».
In the « View » :
Here you can create views, which are sets of rules for including or excluding MIB elements in our supervision via their OID. The « ViewDefault » view includes OID 1, i.e. all the elements of this MIB (since it is a hierarchical system) except for the 3 excluded OIDs.
For this tutorial, we are going to use this « ViewDefault ». You can therefore go directly to « Ajouter une communauté SNMP ».
Add an SNMP community (SNMP v1/v2c)
In the « Community » :
Click on « Add ». New fields will appear:
Community NameGive the name of the SNMP community.
Access RightChoose the type of access (leave « read-only » because ESIA does not use write).
ViewSelect the view you wish to use with this community.
Then click on « Apply ».
That's it, SNMP is now configured for versions v1 and v2c.
Don't forget to click on « Save » at the top right. Otherwise your configuration will be lost when the switch is rebooted.
For more details: </ignore> HP Support - See the tutorial on configuring SNMP v1/v2c.
If you wish to configure SNMP v3
It is not necessary to use SNMP v3 with ESIA. However, if you do want to enable it, you should know that in ESIA you can only configure your nodes for SNMP v3 by adding them manually (See Adding nodes manually). Via a network scan, you can only configure in v1 or v2c.
In the « Group » :
Click on « Add ». New fields appear:
Group NameGive the group a name.
Security LevelChoose the security mode.
NoAuth/NoPriv: no security.
Auth/NoPriv: authentication by user and password.
Auth/Priv: authentication by user and password + encrypted communication.
Read View, Write View, Notify ViewChoose the view to be used for access in « Read, Write et Notify » access (here we are using the « ViewDefault » view for Read accesses only).
Then click on « Apply ».
In the tab « User » :
Click on « Add ». New fields appear:
User NameGive the user a name.
Security LevelChoose the security mode.
Group NameChoose the name of the group (the one created previously and linked to the view you wish to use).
Authentication ModeIf security mode « Auth » is selected, choose the Hash algorithm to use (MD5 or SHA).
Authentication PasswordType a password for authentication. Confirm the password.
Privacy ModeIf security mode « Priv » is selected, choose the encryption mode (DES56, AES128 or 3DES).
Privacy PasswordType a password for encryption. Confirm the password.
Then click on « Apply ».
That's it, SNMP is now configured for version v3.
Don't forget to click on « Save » at the top right. Otherwise your configuration will be lost when the switch is rebooted.
More information
</ignore> HP Support - See the SNMP v3 configuration tutorial.
For more information on HP-1910 Switches : </ignore> See HP-1910 support.


