Table of Contents
Installing an Esia Galaxy server
Installation
Requirements
To MINIMUM (depending on the number of services), a server or VM with :
- 4 cores (64 bits)
- 4 GB RAM
- 30 GB of disk space
Debian 12 Bookworm 64-bit (amd64) Download
- The Esia Mercury server must have HTTPS access to this Galaxy server.
Here is the link for the step-by-step installation of Debian. When selecting software, I advise you to uncheck everything except 'SSH server'.
Adding the esia repo
In order to install Galaxy on your server, you need to add our repository to the list of trusted repositories on your server. To do this, simply enter the following commands.
- copy
echo "deb http://stable.repository.esia-sa.com/esia bookworm contrib non-free" >> /etc/apt/sources.list
wget -O- "http://stable.repository.esia-sa.com/esia/gnupg.key" | apt-key add -
Install packages
Enter the following commands:
- copy
apt-get update
apt-get install esia-galaxy-base -y
For remote access to your Galaxy
Via Windows
- via ssh cmd
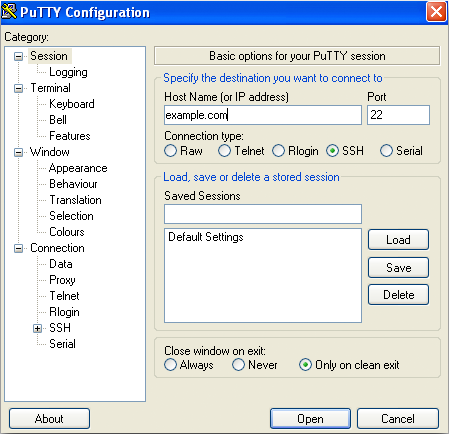
Example on PuTTy Téléchargeable here. Once it has been installed and launched, follow the steps below:
- In the Host Name (or IP address) field, enter the IP address of your Galaxy server.
- In the Port field, enter 22 if it is not already entered.
- Tick SSH.
- Click Open.
The login and password to be entered are those entered for the user created when you installed your Debian 11 bullseye.
Via Mac or GNU/Linux
Open a command line terminal
$USERNAME corresponding to the user login and $IP the IP address of your VM.
Example:
elessar@julien-esia-pc ~ $ ssh esiauser@10.12.0.203

The authenticity of host '10.12.0.203 (10.12.0.203)' can't be established.
ECDSA key fingerprint is SHA256:vB+p7UwKmXbdrQDctldkEI5sJIFqz4TdbAK4j8jyqJ4.
Are you sure you want to continue connecting (yes/no)? yes
Warning: Permanently added '10.12.0.203' (ECDSA) to the list of known hosts.
esiauser@10.12.0.203's password:

The programs included with the Debian GNU/Linux system are free software;
the exact distribution terms for each program are described in the
individual files in /usr/share/doc/*/copyright.

Debian GNU/Linux comes with ABSOLUTELY NO WARRANTY, to the extent
permitted by applicable law.

***** Welcome to Esia Galaxy !!! *****

With root permissions. You can configure your server with command "esia-configure".

* Network with esia-configure -S net
* Users with esia-configure -S user
* Alerting mail with esia-configure -S mail

For example for a first setup :

* esia-configure -S user -A add -u galaxy -e jdoe@example.com -P
* esia-configure -S mail -u alert@example.com -P -r smtp.mail.example.com:465
* esia-configure -S net -M static -i eth1 -a 10.12.0.201 -m 255.255.255.0 -g 10.12.0.254 -n 8.8.8.8

For more help, you can :

* run esia-configuration --help
* visit page http://wiki.esia-sa.com
* send mail to support@esia-sa.com
* call +32 (0) 42 87 75 80 or +33 (01) 86 95 80 41

esiauser@debian-buster:~$
Get root(s) rights
Depending on the configuration of your Debian system :
Using su :
esiauser@debian-buster:~$ su -
Password:
root@debian-buster:/home/esiauser#
Using sudo :
esiauser@debian-buster:~$ sudo -i
Password:
root@debian-buster:/home/esiauser#
Note that the password is different depending on the user:
- With su, the password is that of the 'root' user.
- With sudo, the password is that of the current user (esiauser in my example).
Configuring the Galaxy for the first time
The command esia-configure command on your Esia Galaxy to perform the configuration operations required for your server to function correctly. This command allows you to :
- Create and manage future administrators (root group in the interface) of your esia.
- Configure your network interface.
- configure an SMTP server to send alerting emails.
Users managed by esia-configure are those who will be able to access the Esia web interface. To configure Debian users (SSH connection for example). Use the basic GNU/Linux commands:
- change the root password :
passwd - change the user password (user with esiauser login)
passwd esiauser
This tutorial explains the main uses ofesia-configure. For more advanced use, see the :
- copy
esia-configure --help
Creating the first user IDs
I recommend that you start by creating 2 user IDs, 1 for yourself and one for your Esia Infinity server. The syntax is :
- copy
esia-configure -S user -A add -u $LOGIN -e $EMAIL -P
The options are :
- S user (Section) to specify that you want to act on the user section
- A add (Action add) to specify that you want to add a user
- u $LOGIN (User) replace $LOGIN with the desired user.
- e $EMAIL (Email) replace $EMAIL with the email address of the desired user.
- P (Prompt password) to enter the user password securely. (The -p $PASS option, used in certain cases, will keep the password in the history of commands entered).
Examples for creating an Infinity user and a jdoe user :
root@debian-buster:/# esia-configure -S user -A add -u jdoe -e jdoe@example.com -P
Password:
Confirm password:
Do you want to add user jdoe,jdoe@example.com with root permissions
Do you wish to apply this ? (y,n) y
root@debian-buster:/#
root@debian-buster:/# esia-configure -S user -A add -u infinity -e infinity@example.com -P
Password:
Confirm password:
Do you want to add user infinity,infinity@example.com with root permissions
Do you wish to apply this ? (y,n) y
If your Galaxy can already be reached on the web (IP address and/or urls already configured), the user jdoe can now connect and you can integrate your Esia Galaxy into your Esia Infinity server (with the infinity login).
Configuration of the email alerting system
Before starting, you need an SMTP mail server capable of relaying the mails generated by your Esia server. This mail server must of course be reachable by Esia. To access this mail server, the Esia server will need to know :
- the email address that the Esia server will use to send these emails. (Example: no-reply@example.com or alert@example.com)
- the IP or domain name of your relay mail server.
- SMTP port used (25, 465, …).
- an authentication login if necessary.
- the password corresponding to the login if necessary.
The command syntax is :
- copy
esia-configure -S mail -f $EMAIL -r $HOST:$PORT -u $LOGIN -P
Not all parameters are mandatory. They correspond to :
- -S mail (Section) to specify that you wish to act on the mail section
- f $EMAIL (From) replace $EMAIL with the email address assigned to the server (Example: no-reply@example.com)
- r $HOST:PORT (Relayhost) replace $HOST with the url of your mail server (smtp.example.com) and $PORT with the port (25,465, …)
- u $LOGIN (User) replace $LOGIN with the desired user.
- P (Prompt password) to enter the user password securely. (The -p $PASS option, used in certain cases, will keep the password in the history of commands entered.)
Example:
root@debian-buster:/# esia-configure -S mail -f alert@example.com -r smtp.example.com:465 -u alert -P
Password:
Confirm password:
This settings will be set :

From changed => alert@example.com
Relayhost: => smtp.example.com:465
User changed => alert
Pass changed

Do you wish to apply this ? (y,n) y
root@debian-buster:/#
Now test your SMTP connection Test sending emails.
Server network configuration
Always use the command esia-configure.
The possible syntaxes are :
esia-configure -S net -M static -i $IFACE -a $IP -m $MASK -g $ROUTER -n $DNS1,$DNS2
esia-configure -S net -M static -i $IFACE -a $IP -m $MASK
esia-configure -S net -M static -i $IFACE -g $ROUTER
esia-configure -S net -n $DNS1,$DNS2
The parameters are :
- S net (Section) to specify that you want to act on the net section.
- M static|dhcp (Mode) to specify whether the interface is to be configured as static or dhcp.
- i $IFACE (Interface) network interface to configure (eth0, …).
- a $IP (Address) is the IP address assigned to the network interface.
- m $MASK (Mask) is the subnet mask corresponding to the IP address (255.255.255.0, …).
- g $ROUTER (Gateway) is the gateway or router used to exit the network.
- n $DNS1,$DNS2 (Nameservers) is the dns server(s) to be used. (List separated by « , » the first being given priority).
Warning: if you are using an SSH connection, changing the network configuration may cause the connection to be lost (possible crash of the current terminal). You must then reconnect to the new IP address.
Example :
root@debian-buster:/# esia-configure -S net -M static -i eth0 -a 192.168.1.10 -m 255.255.255.0 -g 192.168.1.1 -n 192.168.1.1,8.8.8.8
#Generate configuration is :
##For /etc/network/interfaces
iface lo inet loopback

auto eth1
allow-hotplug eth1
iface eth1 inet static
    address 10.12.0.203
    netmask 255.255.255.0
    broadcast 10.12.0.255

auto eth0
allow-hotplug eth0
iface eth0 inet static
    address 192.168.1.10
    netmask 255.255.255.0
    gateway 192.168.1.1


##For /etc/resolv.conf
domain esia.local
search esia.local
nameserver 192.168.1.1
nameserver 8.8.8.8

#If you apply, your ssh connection could be lost
#Do you wish to apply this ? (y,n) y
Go to your Esia main web page and add the licence
After the update, connect to your Esia server and refresh your browser cache (ctrl +F5 in Firefox). The menu button bugs will be corrected. Once this is done, you will notice two error messages in your Esia:
Error Esia program not started
and
Licence not found. click here
to add a licence file
These 2 error messages are linked, the Esia daemon cannot start until the licence is activated.
To activate it, simply :
- Click on the link
herein the error message. - Click on the button
load the licence file. - Click on the button
Apply
The licence error message disappears. But Error Esia program not started is still present. See next step.
Wait for the Esia daemon to restart or launch it manually
At this stage, either :
- Wait a few minutes (between 0 and 5 minutes)
- Run the following command:
- copy
service esia restart
The error message in the interface will disappear.
Integrating a Galaxy into an Infinity/Mercury
Adding the Galaxy node
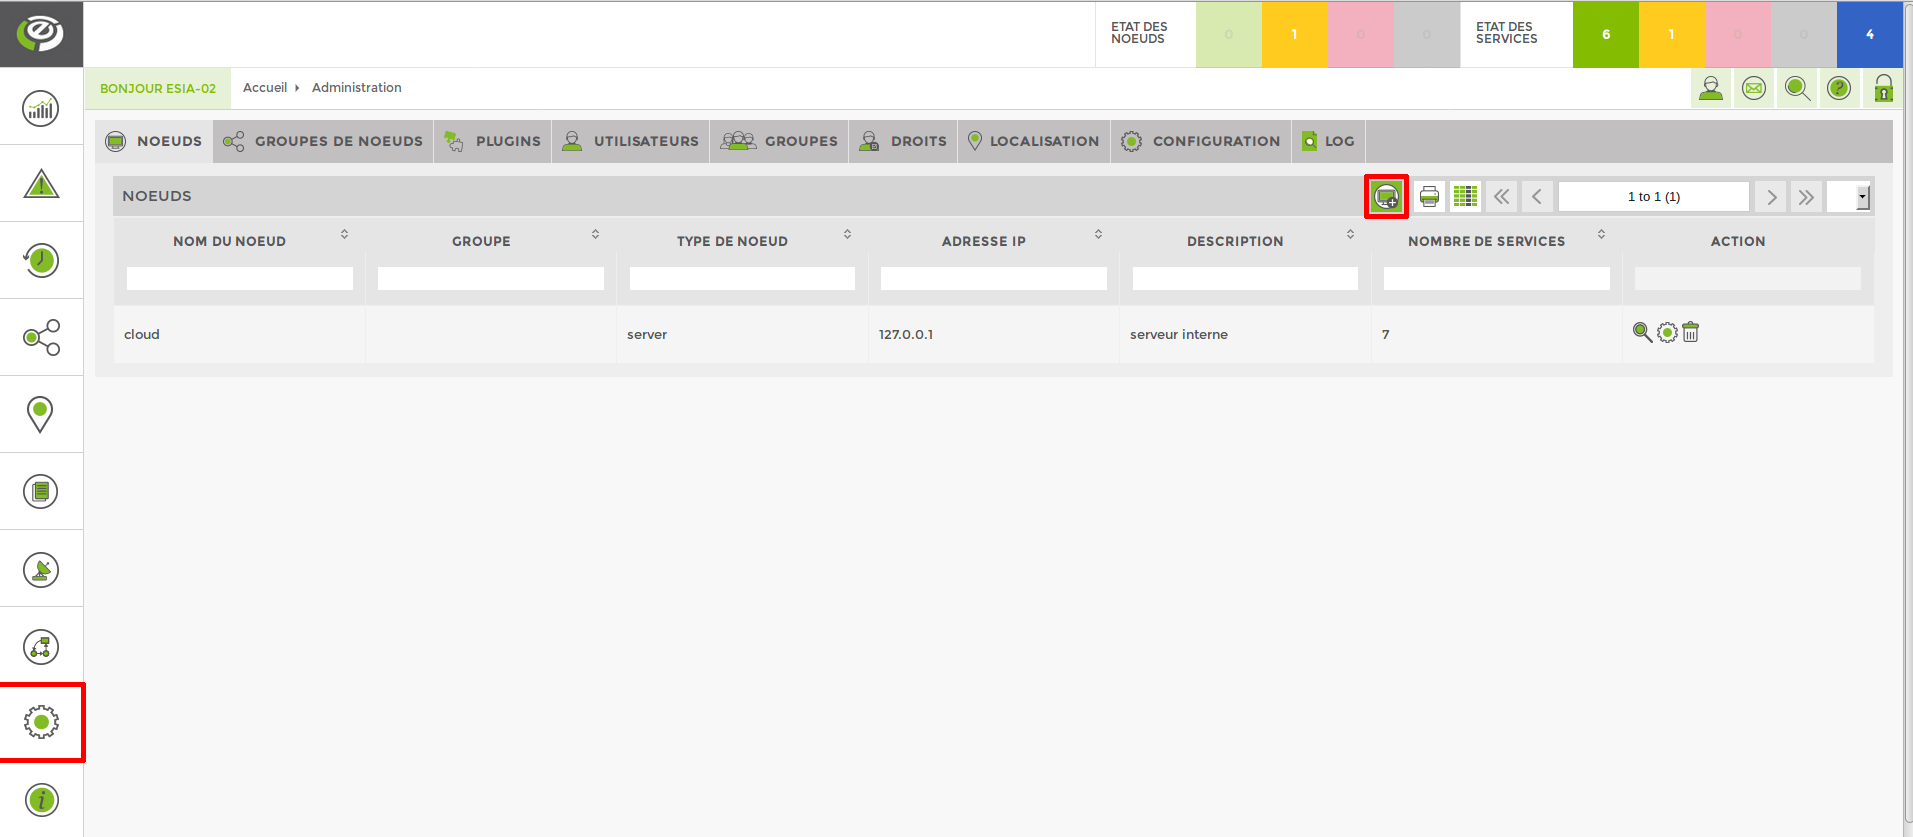
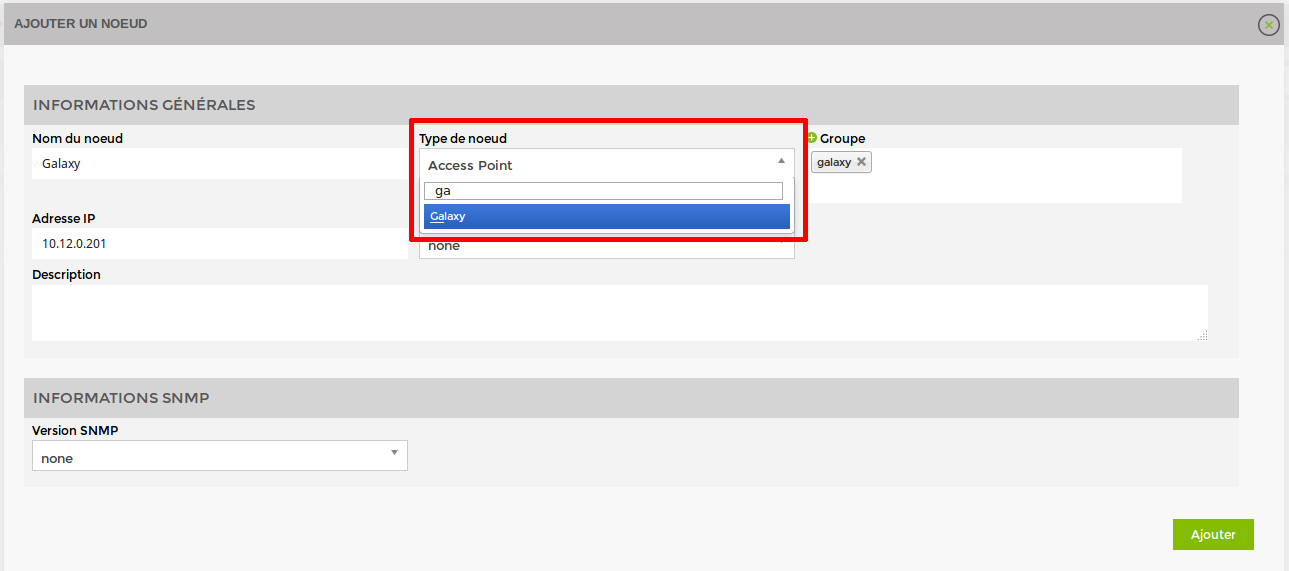
To do this, you need to add a 'Galaxy' node
Go to the node administration page (jagged wheel in the menu).
Configure your node in the same way as all other nodes.
Give it a name.
Configure an IP address
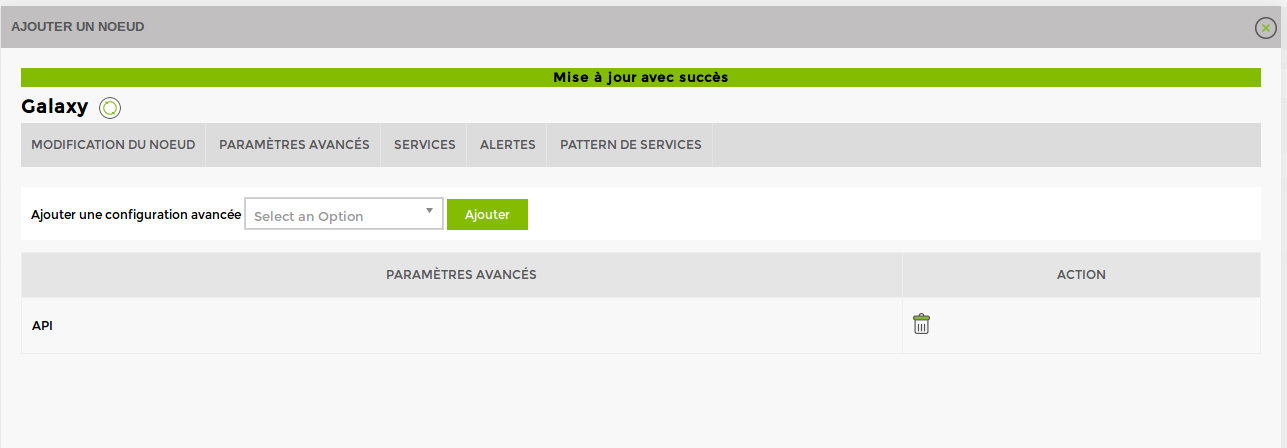
Configure the connection parameters to the Galaxy server.
A URL
A port
Galaxy node pages
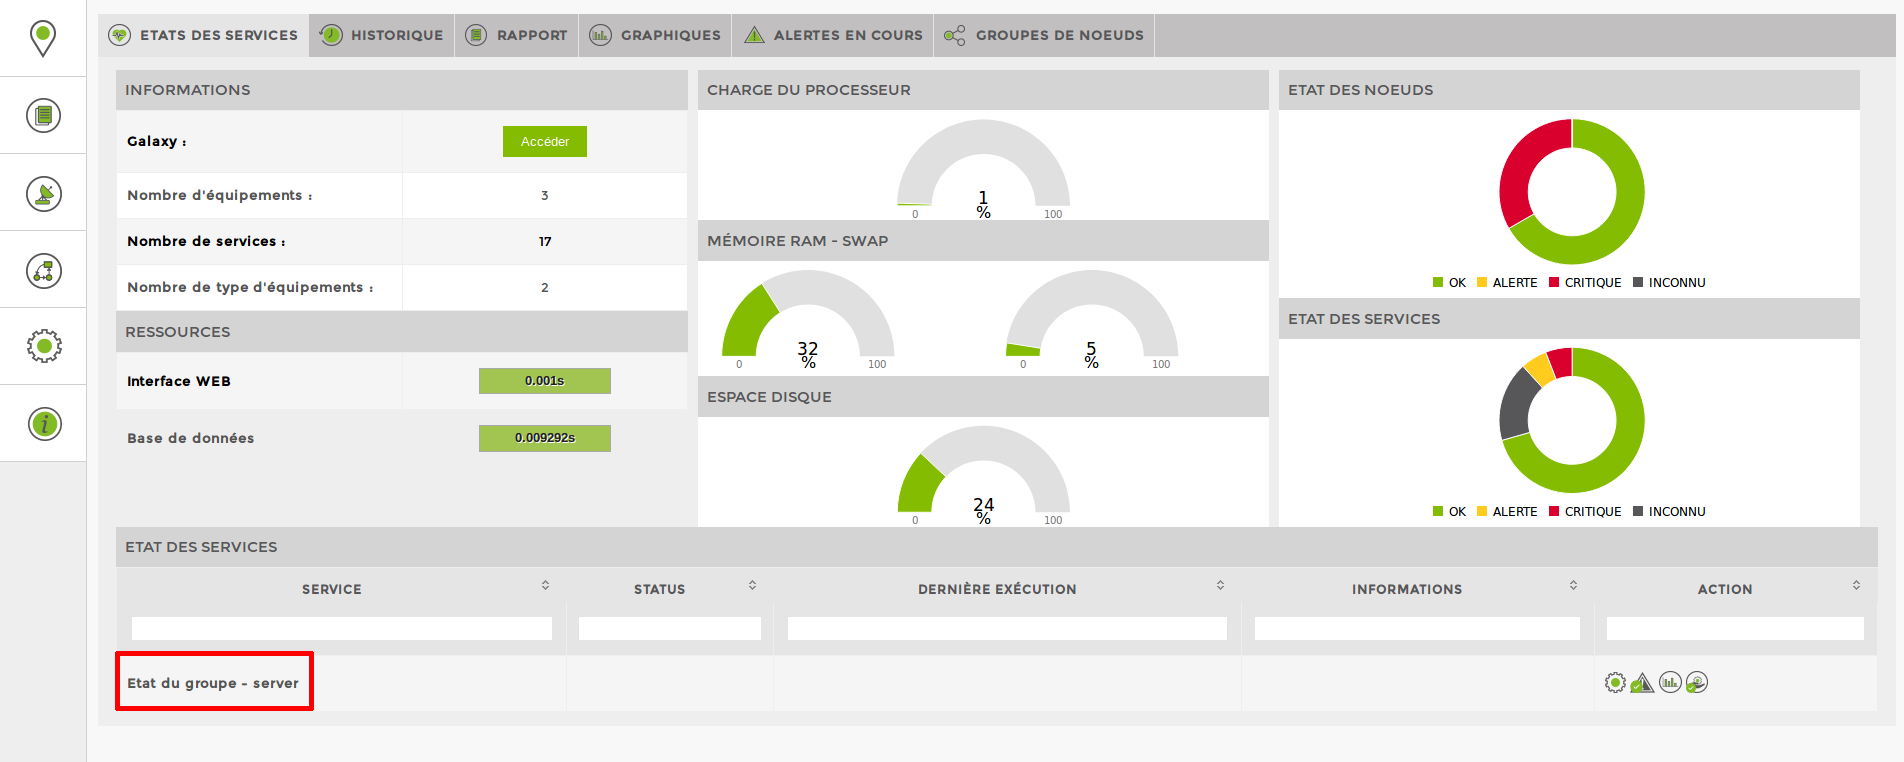
On your Infinity, when you click to view your Esia Galaxy node, you go directly to the 'Service Status' tab. Here you can see :
- The 'Information' table containing status information on Galaxy equipment and services and a direct access button.
- The 'Resources' table containing access times to the Galaxy web interface and database.
- Graphs showing the performance of the computer running the Galaxy.
- Graphs showing the status of nodes and the Galaxy service.
You'll also see the usual 'Service Status' table, where you can see which monitoring services have been added.
The Current Alerts tab lets you view your Galaxy's alerts page as if you were there.
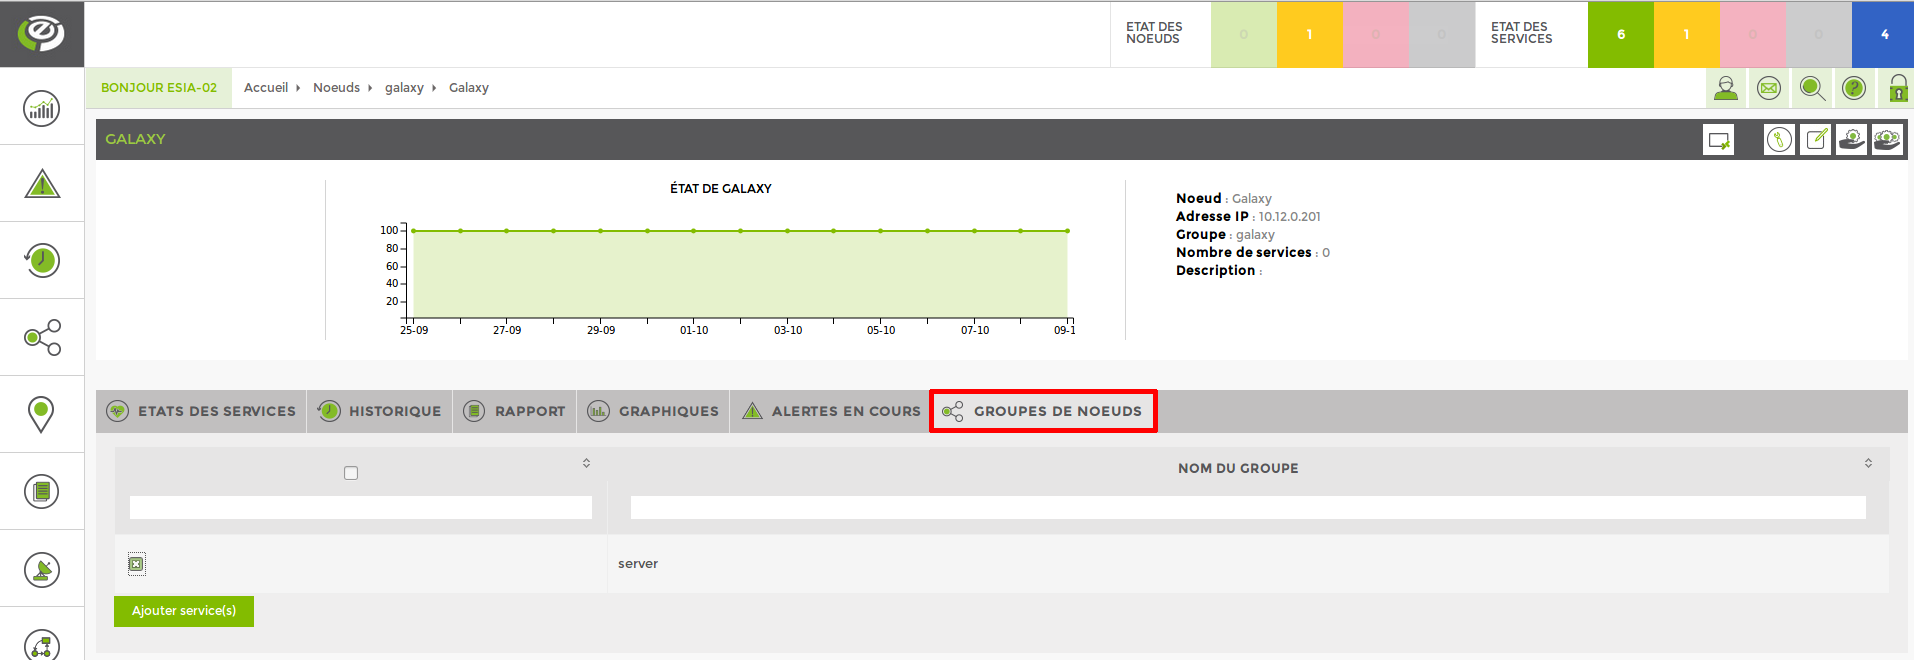
The “Node groups” tab allows you to add services to monitor the status of a group of nodes.
You can view the newly added group supervision services directly in the service status.
Adding services
There are currently 3 monitoring plugins that can be applied to a Galaxy.
- The CHECK_API_ALERT plugin for checking whether alerts are present on the Galaxy.
- The CHECK_API_GROUPNODE_STATE plugin for checking the status of groups of nodes (see above to see how to add it simply).
- The CHECK_API_NODE_STATE plugin for monitoring the status of any node based on its name.
On the Galaxy node's “Service Status” page, in the top right-hand corner, you can click on the icon (hand with toothed wheel) to add new services.
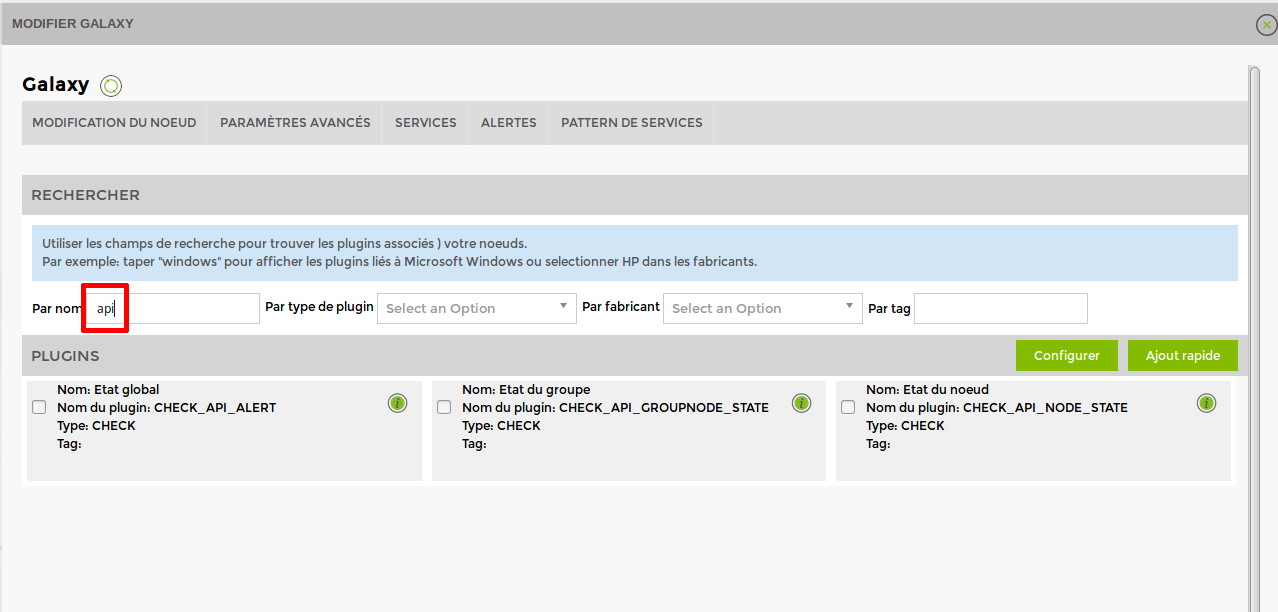
Using the service name filter, with the word “API”, we can see our 3 Galaxy plugins.
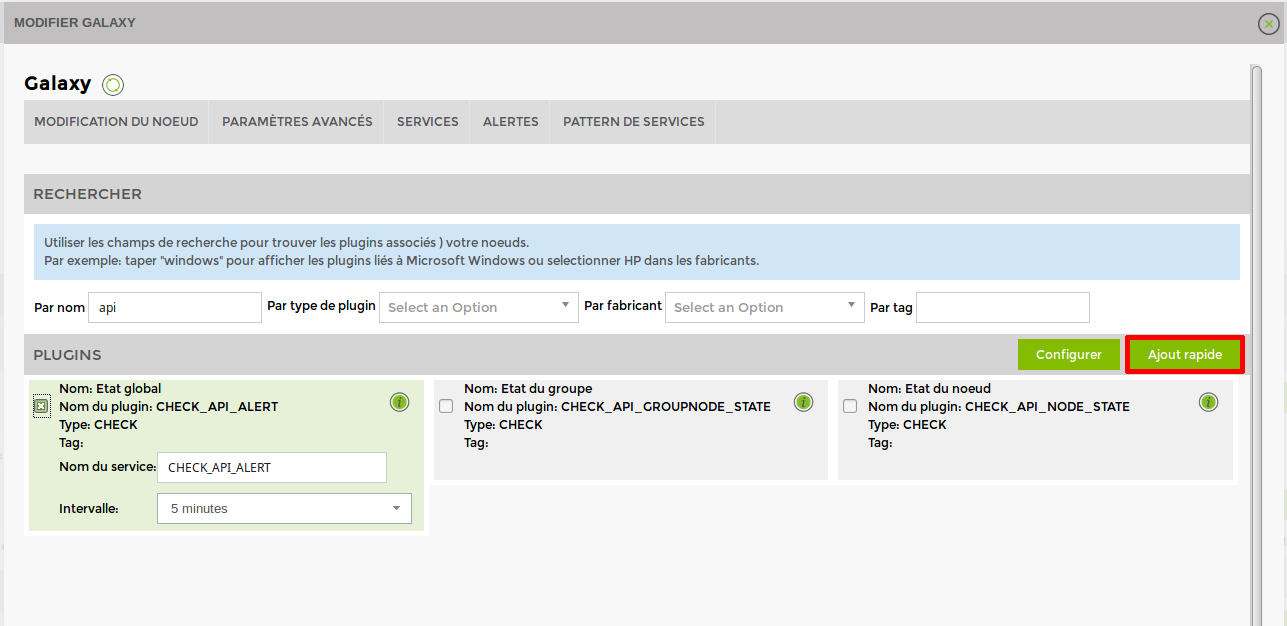
To add the CHECK_API_ALERT plugin, simply tick it and then click on 'Quick add'.
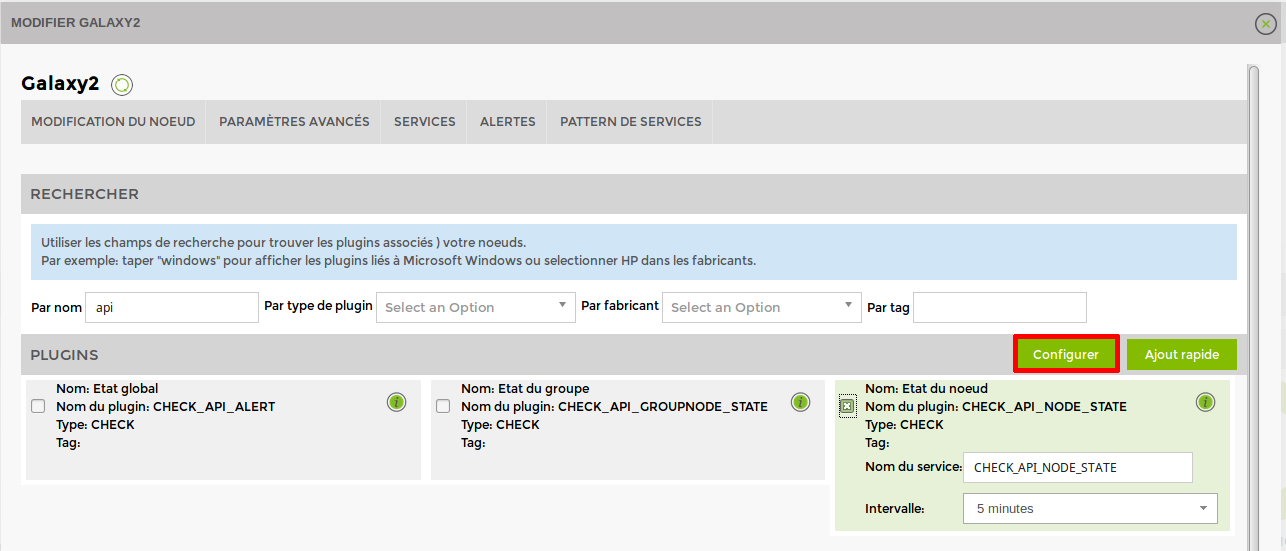
If you wish to monitor the status of a particular node, you will need to click on the “Configure” button.
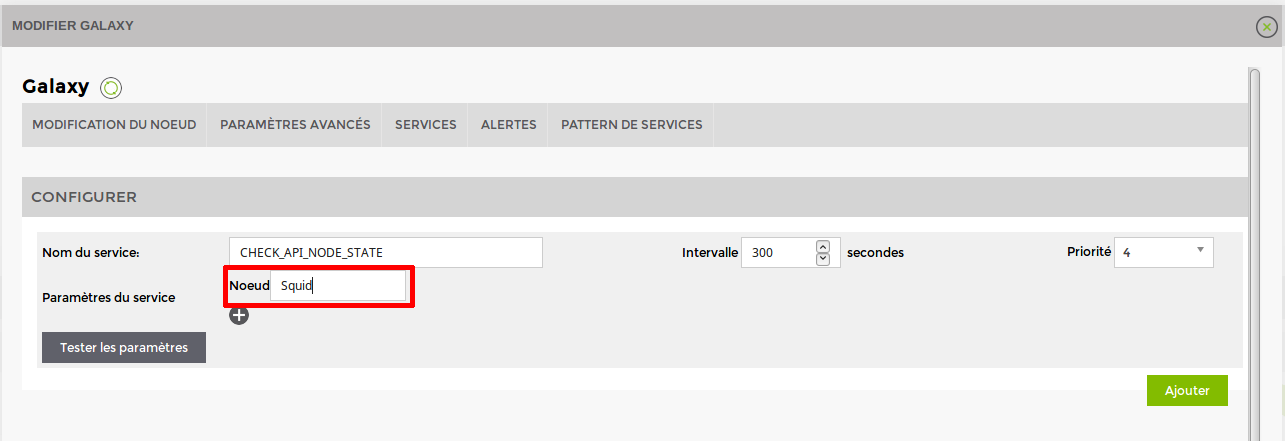
Enter the name of the node to be monitored.






![Galaxy service status IMG:Nodes[:type=Galaxy]->Service status Galaxy service status IMG:Nodes[:type=Galaxy]->Service status](/_media/intro/galaxy_main_page.png)
![Current alerts on the Galaxy IMG:Nodes[:type=Galaxy]->Current alerts Current alerts on the Galaxy IMG:Nodes[:type=Galaxy]->Current alerts](/_media/intro/galaxy_alert_page.png)
![Service status, button for manually adding services IMG:Nodes[:type=Galaxy]->Service status => Add service button Service status, button for manually adding services IMG:Nodes[:type=Galaxy]->Service status => Add service button](/_media/intro/galaxy_another_add.png)
