Table of Contents
Installing and configuring the Office 365 module
Installation
The Microsoft 365 Web plugin is not installed by default on Esia platforms. You must first install the corresponding package. Connect using SSH with a root account on your Esia server. Type the following commands
- copy
apt update
apt install esia-webp-office365
If it does not find the package, the Esia repository has not been added to your server. You can add it by following the corresponding part of the following tutorial: Installing an Esia Galaxy server
Once installed, go to the Esia administration WEB interface.
Configuration
Before configuring the node, you must authorise Esia to contact your Office 365 instance. You can follow the tutorial below: Microsoft Office 365
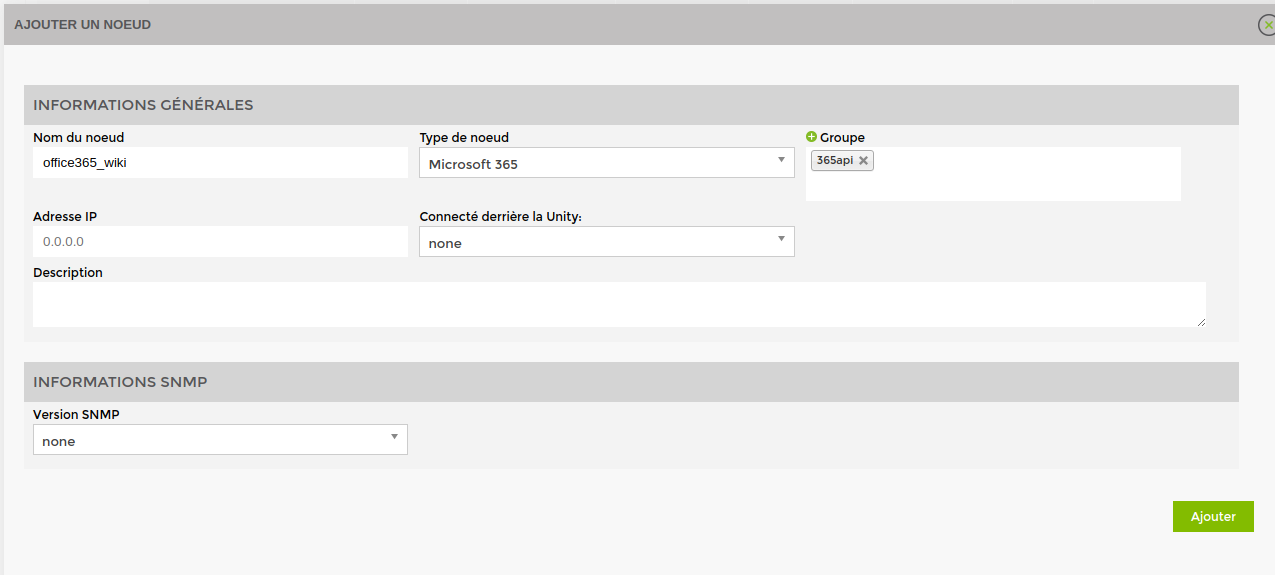
In the Esia administration interface, click on “Add Node”.

Enter a name for your node and select “Microsoft 365” as the node type. Don't forget to put your node in a group. To finish, click on “Add”.
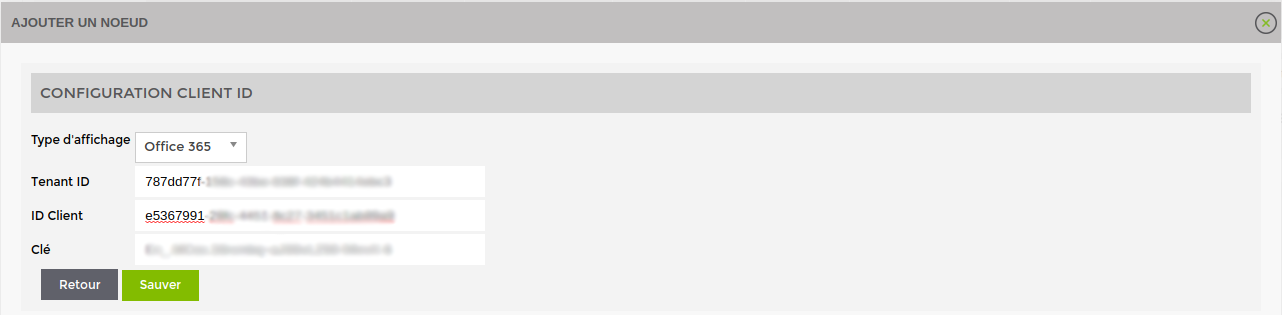
You now need to fill in the 3 parameters you specified (Tenant ID, Client ID and the key). Then click on “Save”.
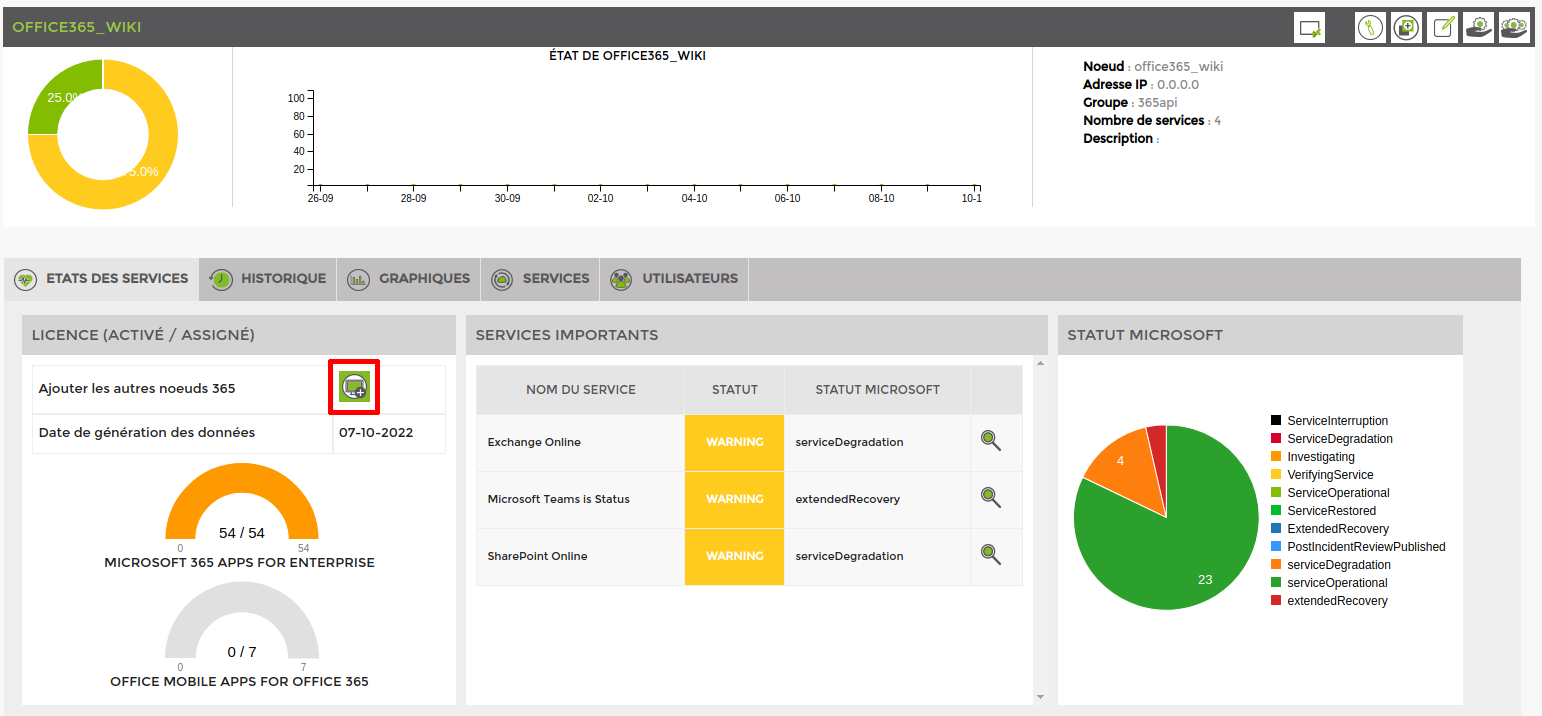
You can close the window and see that a service and a node have been added. Once the group has appeared, you can click on the node and you will arrive on this page.
The central part is empty, because there are currently no important services to monitor. To add one, click on the “Services” tab.

3 new services have been added and will monitor the status of Microsoft services.
Select the services you want to monitor. I've chosen to monitor Exchange, Teams and Sharepoint in this tutorial. Once you've done this, click on “Add service(s)”.

Add the other office 365 nodes
There's more than just the basic Office 365 view available. You can also add the following views:
- Exchange
- Onedrive
- SharePoint
- Teams
To do this, click on “Add other 365 nodes”.
The next page appears:

Select the nodes you want to add, and if necessary change their name and the group to which they will be added (by default: the same as your original Office 365 node).
Once you have done this, click on “Add” and close the window. The nodes will be automatically added with the following elements:
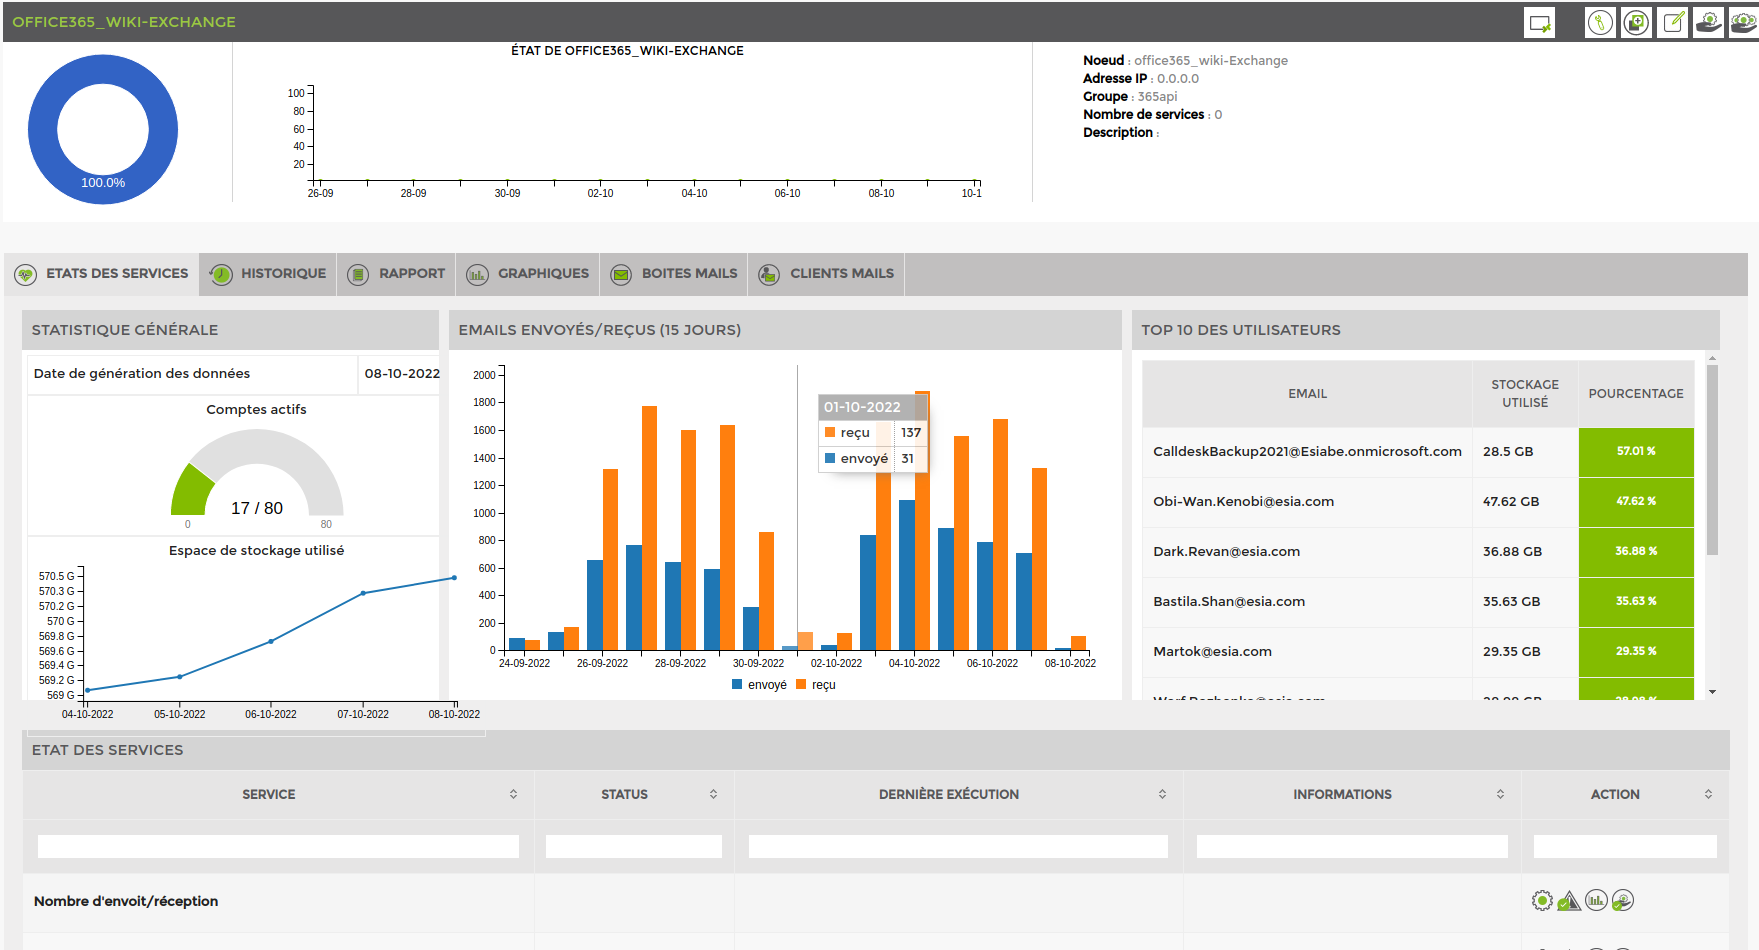
Exchange
Here is the available view and 2 services are automatically added:
- Mailbox usage: turns yellow or red if the mailbox has reached its quota or is blocked.
- Number of mails sent/received: test the number of mails sent/received daily by default the alert and critical values are 1500 and 2000 mails.
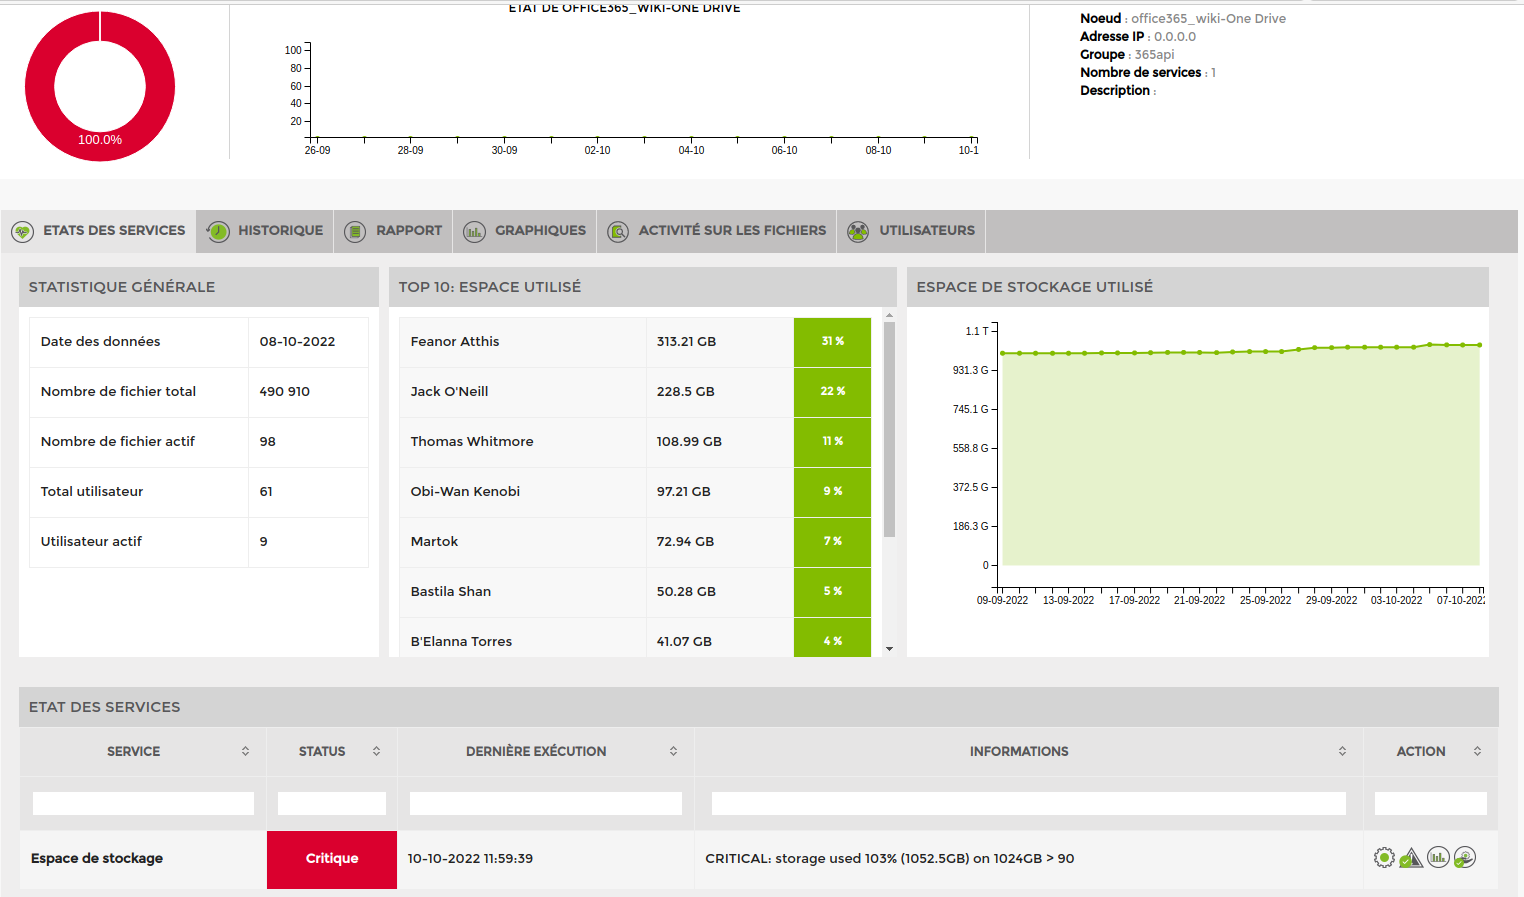
Onedrive
Here is the available view and 1 service is automatically added. It tests OneDrive's global storage space
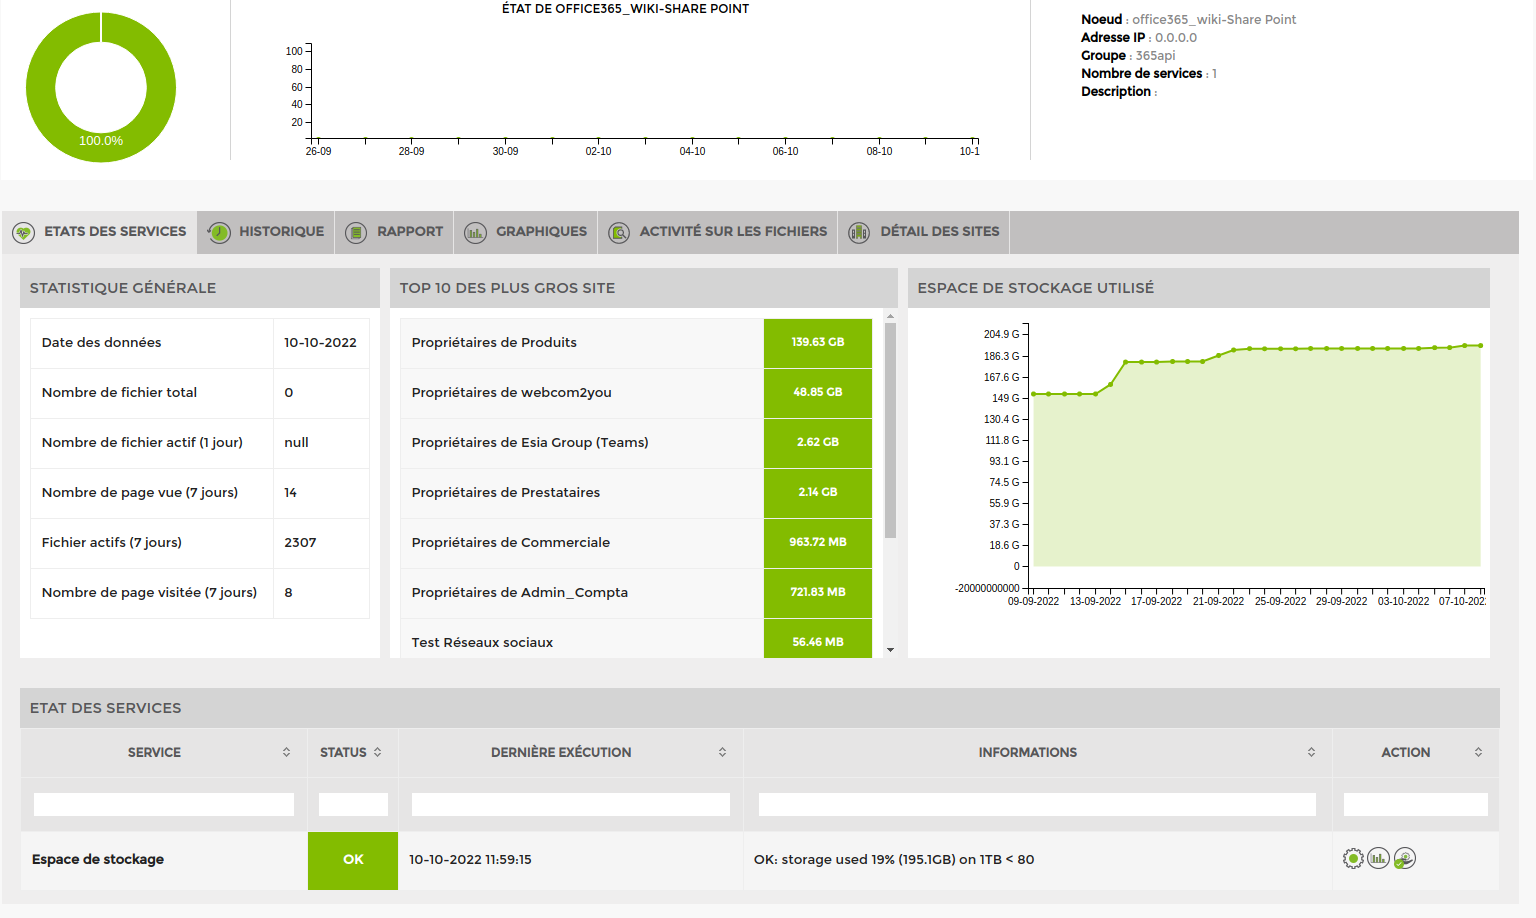
Sharepoint
Here is the available view and 1 service is automatically added. It tests the global storage space of all Sharepoint sites.
Teams
Here's the available view.

Defender
Requires a Svalinn license (Available from Esia version 3.5.2)
“Microsoft Graphics” API access rights :
- SecurityEvents.Read.All
- SecurityAlert.Read.All
- SecurityIncident.Read.All
- AuditLog.Read.All
Plugins
Plugins added on node creation :
Active alerts (CHECK_API_M365_SECURITY_ALERT_ACTIVE) :
Status “alert” or “critical” depending on the number of active alerts.
Recent alerts (CHECK_API_M365_SECURITY_ALERT_COUNT) :
Status “alert” or “critical” depending on the number of alerts (of all types, not just active ones) that have occurred over a period of time. Default is 1 day.
Active incidents (CHECK_API_M365_SECURITY_INCIDENT_ACTIVE) :
Status “alert” or “critical” depending on the number of active incidents.
Recent incidents (CHECK_API_M365_SECURITY_INCIDENT_COUNT) :
Status “alert” or “critical” depending on the number of incidents (of all types, not just active ones) that have occurred over a period of time. Default is 1 day.
Secure Score (CHECK_API_M365_SECURITY_SECURESCORE) :
Status “alert” or “critical” depending on the SecureScore percentage value.
Valide authentification - MFA (CHECK_API_M365_SECURITY_USERS_AUTH_COUNT) :
Status “alert” or “critical” depending on the number of users who have not configured valid multi-factor authentication.
Other plugins available :
Valide authentification - SSPR (CHECK_API_M365_SECURITY_USERS_AUTH_COUNT) :
Status “alert” or “critical” depending on the number of users who have not configured valid self-service password reset (SSPR).
Add the plugin, then change the parameter “method=mfa” to “method=sspr”
Exemple : -A $AUTH_FILE_OFFICE365 -t security -n usersAuthMethodCount -a method=sspr -w 1 -c 3
Valide authentification - PasswordLess (CHECK_API_M365_SECURITY_USERS_AUTH_COUNT) :
Status “alert” or “critical” depending on the number of users who have not configured valid password less.
Add the plugin, then change the parameter “method=mfa” to “method=passwordless”
Exemple : -A $AUTH_FILE_OFFICE365 -t security -n usersAuthMethodCount -a method=passwordless -w 1 -c 3
For the CHECK_API_M365_SECURITY_USERS_AUTH_COUNT plugin (MFA, SSPR or PasswordLess), you can test a specific user type by adding the parameter type=<$type> (inside the -a). Here are the available types :
admin ⇒ Only users who are administrators
Exemple : -A $AUTH_FILE_OFFICE365 -t security -n usersAuthMethodCount -a method=mfa,type=admin -w 1 -c 3
member ⇒ Only users who are of type “Member” (See the “Type” column of the table in the “Authentication” tab) and not administrators
Exemple : -A $AUTH_FILE_OFFICE365 -t security -n usersAuthMethodCount -a method=mfa,type=member -w 1 -c 3
guest ⇒ Guest users only
Exemple : -A $AUTH_FILE_OFFICE365 -t security -n usersAuthMethodCount -a method=mfa,type=guest -w 1 -c 3
Several types can be combined, for example all “Administrator” users and “Member” (non-admin) users, so everyone except guests : -A $AUTH_FILE_OFFICE365 -t security -n usersAuthMethodCount -a method=mfa,type=admin:member -w 1 -c 3
Views
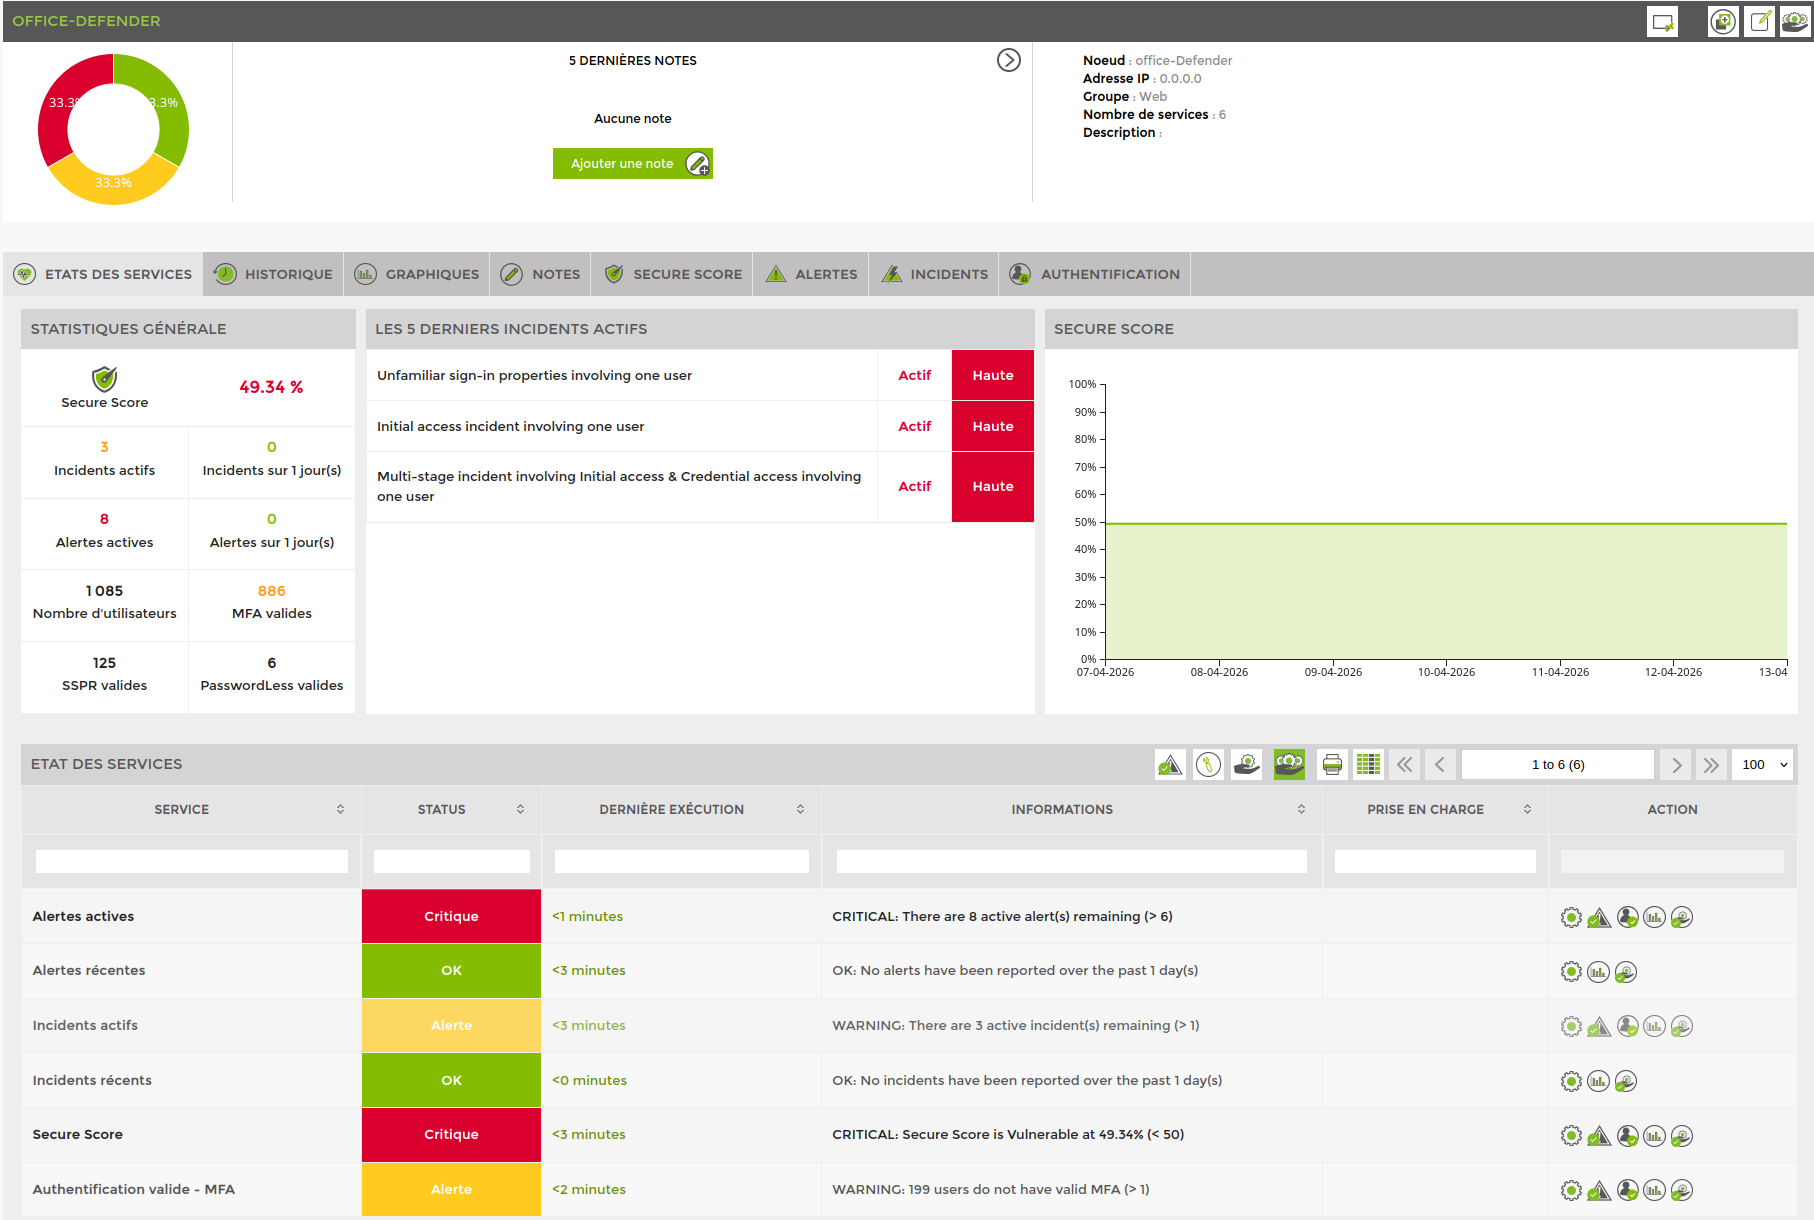
Here is the main view of the node :
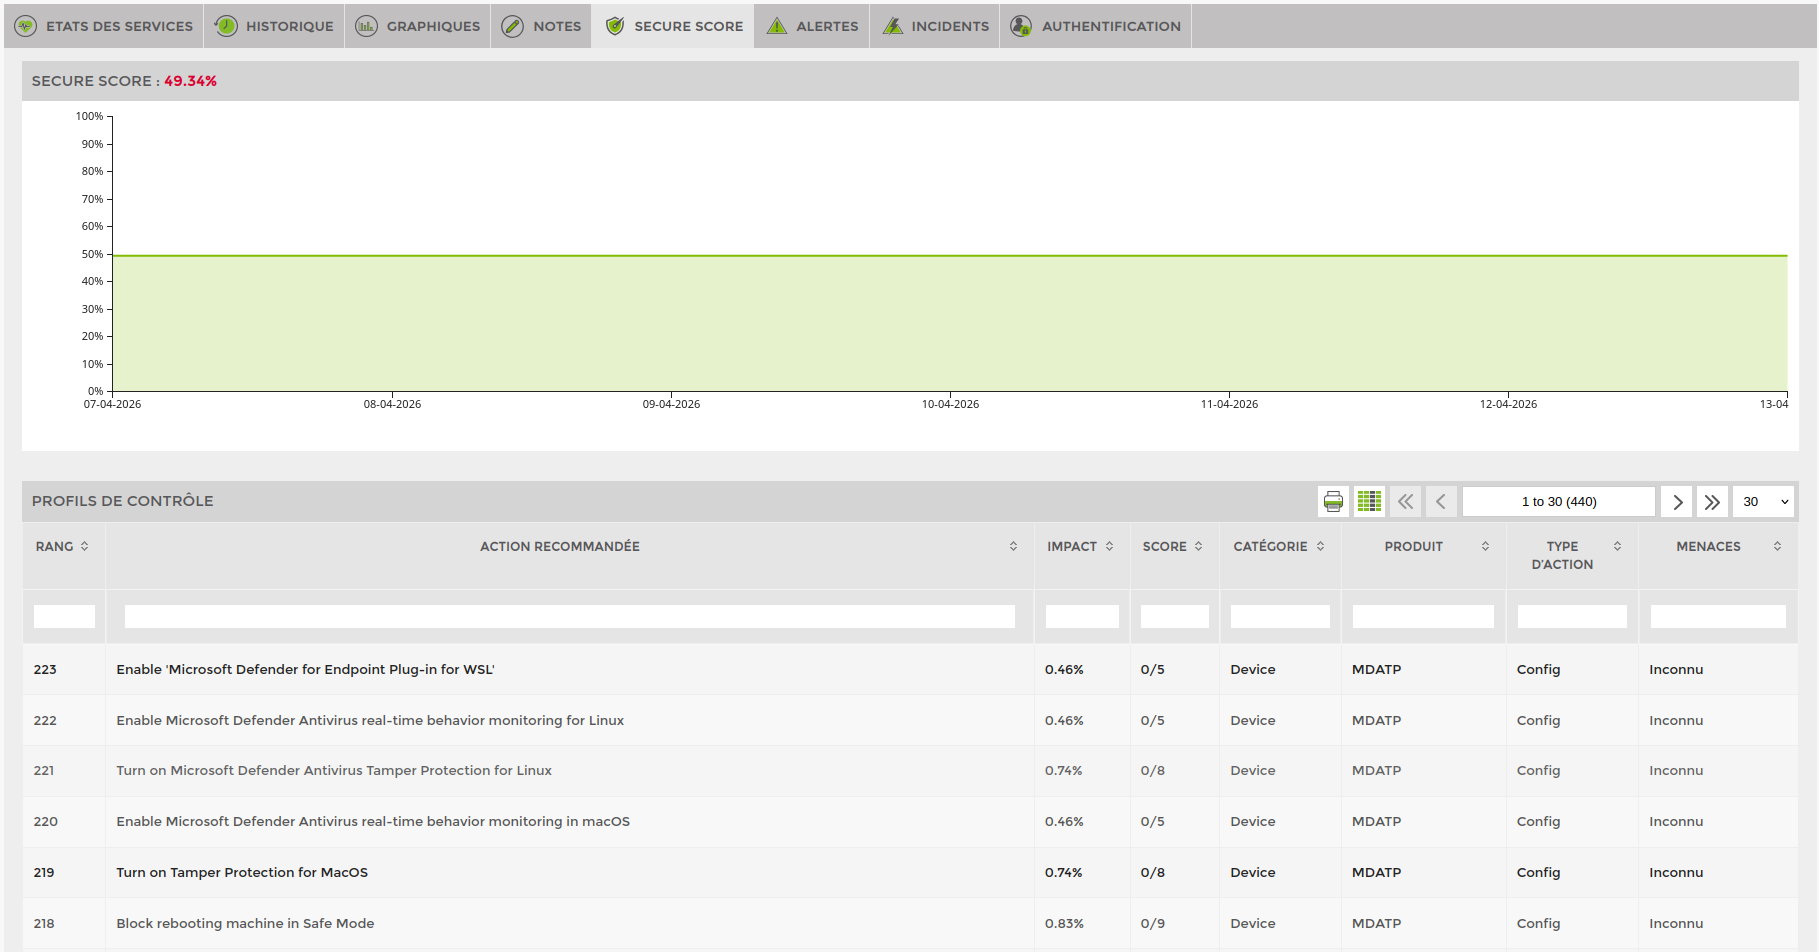
SecureScore tab :
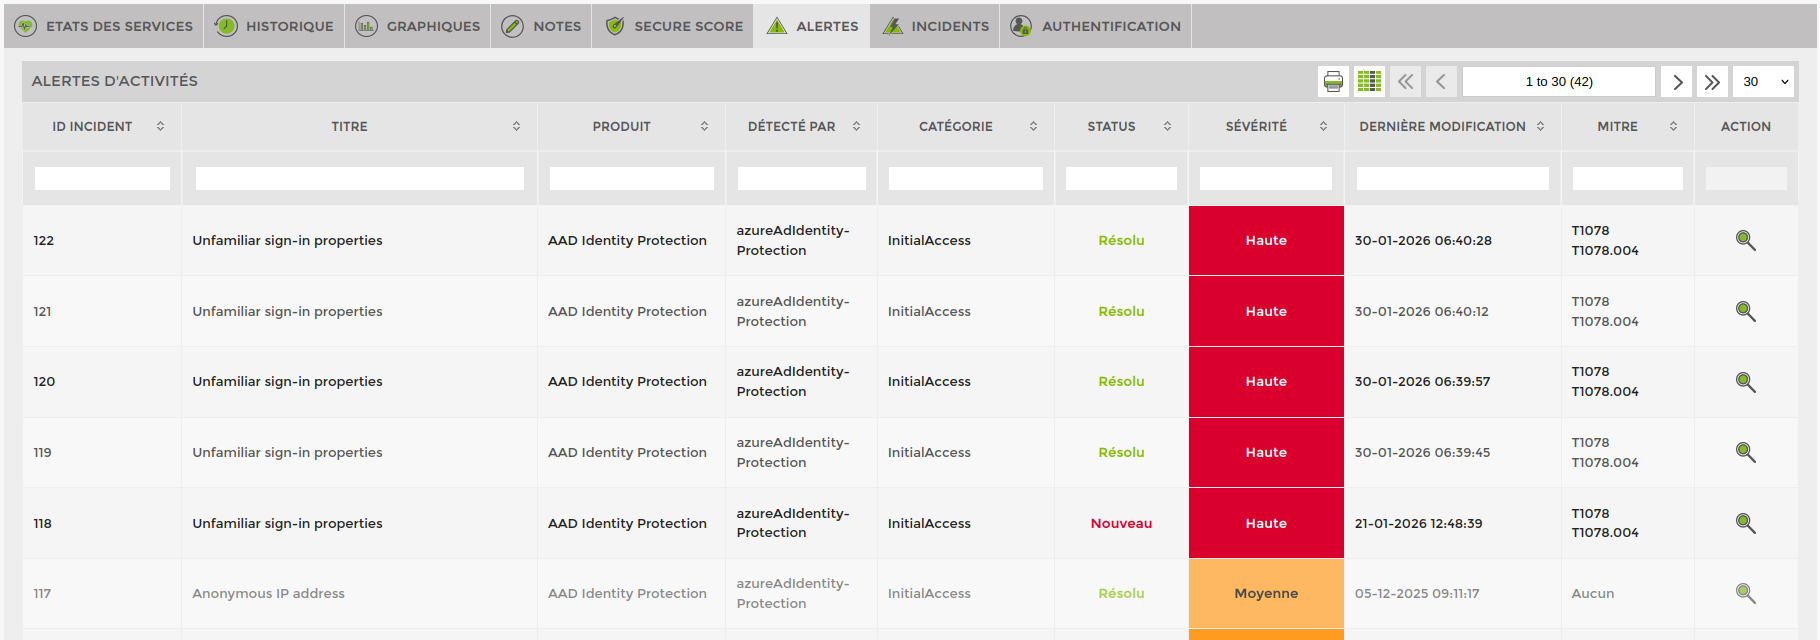
Alerts tab :
Incidents tab :

Authentification tab :
